
Baseline soil sampling is an integral part of a soil carbon project. We’re here to explain exactly what it is and why it needs to be done.
Why Does Soil Sampling Need to Be Done?
The starting point for any soil carbon project is to measure the existing level of soil organic carbon (SOC) in your soil to create a baseline. Baselining is a requirement of a project using the Soil Carbon Method under the Emissions Reduction Fund and determines the starting point for soil carbon gains.
The two components of a baseline are:
- Your farm’s operational carbon emissions.
- How much carbon is already stored in your soil.
Basically, you get rewarded for gains in SOC, less any increases in your on-farm emissions.
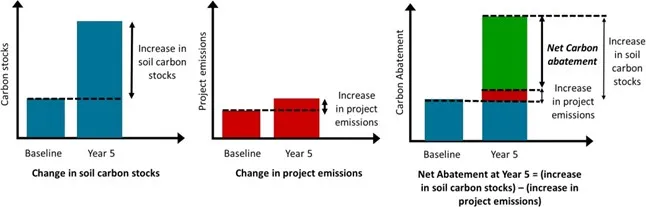
Measurement of soil carbon stocks and increases (Source: ERF Soil Carbon Method 2021)
This is where soil sampling comes in! To measure the current SOC of your project area, soil sampling is undertaken. You can read more about the process of baselining here.
So, What Is the Process of Soil Sampling?
These are the following steps landholders must take to prepare for baseline soil sampling.
- Pre-baseline sampling – (recommended, but not essential). Pre-baselining involves taking a few core samples from around your proposed project area to gain an understanding of your whole soil profile. This includes Soil Organic Carbon levels, as well as other key factors like bulk density, gravel content, and variability. This process can be helpful in designing a more informed Land Management Strategy and more accurate forward abatement estimates. Essentially, it helps to give a clearer picture of what you’re working with prior to committing to a full baseline sampling!
- Prepare your Land Management Strategy (LMS) and register your project. Baselining cannot commence until you have submitted your registration application.
- Prepare a map of your project area. This is a geospatial map that identifies and groups areas with similar characteristics where you plan to build soil carbon (known as Carbon Estimation Areas or CEAs) and areas to be excluded (emission accounting areas and exclusion zones). Your map should then break down CEAs into strata – each strata splits CEA’s into areas with the same characteristics – i.e. land management activities and soil type.
- Determine your approach to random sampling. For example, using a software platform like FarmLab that generates randomized sample points in line with ERF requirements.
- Prepare a sample plan and submit to the Regulator
- Notify the Regulator of the intended location of each sample to be taken
- Book contractors for sampling and lab analysis
- Undertake sampling. We’ll explain this process further below!
Let’s break down Carbon Estimation Areas and Strata.
First up, Carbon Estimation Areas.
Across a property, differences in current and historical land use and soil type will affect the existing soil carbon stock. To level out the variance of carbon stock across a project, a farmer will need to split their project into different areas. These are called Carbon Estimation Areas (CEAs).
CEAs are chosen typically based on prior land use, biophysical land features, and if a farmer plans to implement different eligible practices across the project.
The technicalities behind CEAs can be complex, but the CFF are always here to help! We can connect you to our partner soil sampling companies and local agronomists to best determine your optimal number of CEAs.
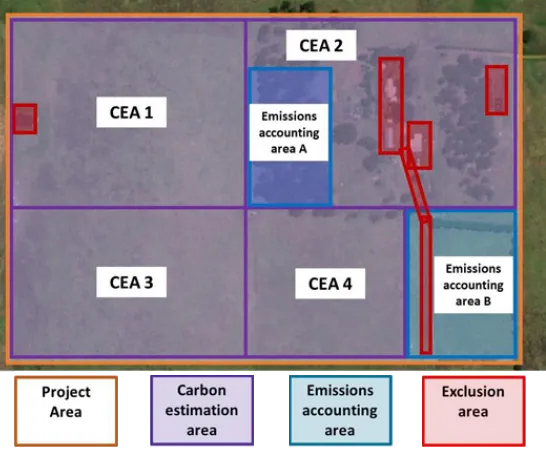
Example of project mapping (Source: 2021 Soil Carbon Methodology)
On top of the variance that CEAs account for, there will also be variance in natural soil types. For example, the soil around dams and waterways may hold more nutrients or organic matter, while soils on the higher ground may contain more sand or rock and fewer nutrients.
To account for this variance, we split each CEA into different soil types or Strata, through a process called stratification. Just remember, all land within one stratified section of a CEA must have the same land management activities applied (e.g., implement no tillage practices across all paddocks in one stratified part of a CEA).
CFF partners with FarmLab to develop stratification maps. Their software uses a complex data-driven algorithm to generate a stratification plan.
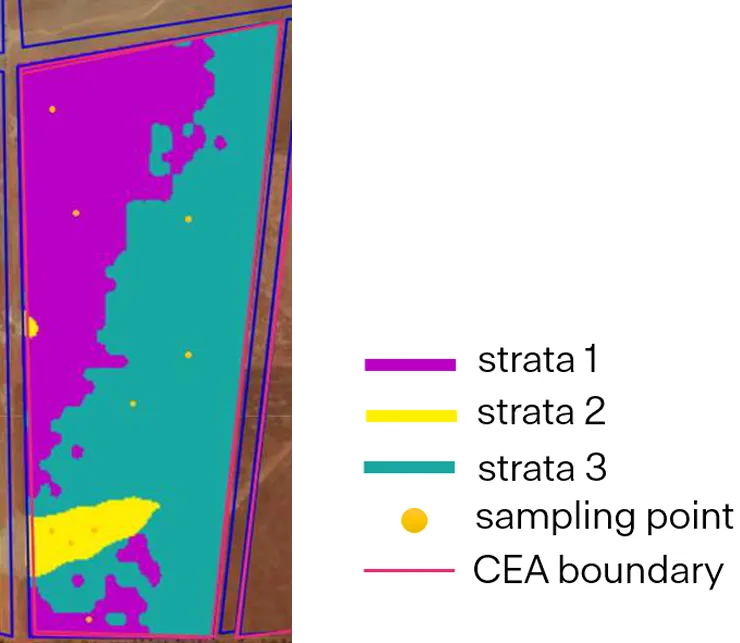
Example of project CEA divided into three strata (as indicated by the different colours of purple, teal and yellow) and three sample points randomly placed within each strata.
Penalties for large variations in soil carbon
Soil carbon stocks are expected to be variable across agricultural land, regardless of any project activities. However, the Regulator penalises variance across Strata by adjusting estimates of soil carbon change in case the observed changes are the result of sampling variance (referred to as ‘sampling noise’, or aberrations) rather than a change in management practices.
The more consistent your increase in soil carbon is across samples, the lower discount is applied. The discount amount will depend on a complex equation and changes between project to project. Strategically stratifying your CEAs at the start of each sampling round means you have a more thorough picture of your soil carbon stocks across the landscape – and reduce the risk of carbon credits discounts.
What is the optimal number of CEAs?
Finding the ideal number of CEAs involves finding a balance between your farm’s objectives, the level of flexibility you need and costs – while also accounting for the variability across your property.
What else do I need to consider?
You will need to consider your goals and soil sampling depth. Depending on your project objectives and the natural landscape across your property, you can choose to measure SOC increases within your soils at two different depths, however, you must nominate the same depth across the whole CEA:
- Depth 1: 0 – 30cm AND/OR
- Depth 2: 30cm – 100cm (or a depth between 30-100cm where 100cm cannot be reached.
Typically, the amount of carbon stored within the top layers of your soil (0-30cm) will usually increase first. As you continue to build up SOC, it will start to be stored deeper in the soil (30cm – 1m).
Regardless of which depth you choose to claim credits for, the Soil Carbon Method 2021 requires you to take samples to a minimum depth of 30cm and a maximum depth of 100cm.
To determine which depth you would like to measure , it is helpful to work with an agronomist to strategically set an achievable target for what percentage SOC increase will be reached across different depths.
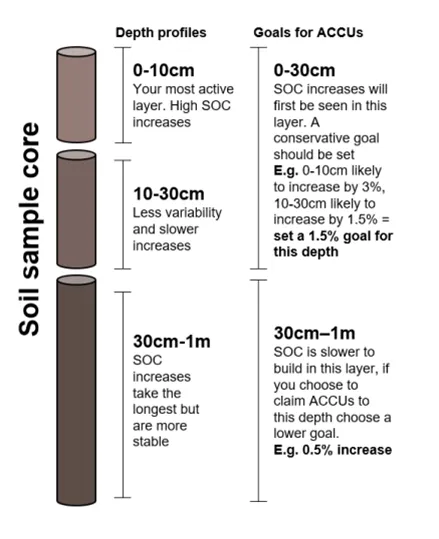
Example depths of a soil sample core and SOC percentage goals.
Ok, now to take the actual soil samples
When taking samples, you are required to carry out the following:
- Samples must be collected by an independent expert with a good understanding of the ERF sampling requirements. They must not have a financial interest in the project or be the person who completed your LMS. If you need help finding an independent reviewer, we can help connect you.
- Samples are collected manually using a machine, which pushes coring tubes into the ground and extracts core samples
- Select project areas that can be sampled relatively easily to a depth of at least 30cm (i.e., avoid rocky areas and shallow soils).
- Traditional soil testing requires samples from the field to be sent off to a lab for analysis.
- Once your sample analysis comes back, you will have a clear picture of your baseline and can get to planning your project.
Over the project lifetime, further soil sampling will verify whether the management plan you earlier identified in your LMS is working. You will also need to update your LMS every 5 years to acknowledge any change in how you are increasing SOC (and every 10 years once your 25-year crediting period is finished – if you’re doing a 100-year permanence project).
Soil sampling can be complex, so we recommend consulting an agronomist with an understanding of the Clean Energy Regulator’s requirements to ensure your plan aligns with your planned activities to increase SOC. The CFF is happy to help you through the baseline sampling stage of your project to make sure everything goes smoothly!
What’s Next?
Once you’ve undertaken your baselining, you can now commence implementing your new land management activities! You must continue to sample and report at least every 5 years to measure and prove any SOC gains and update your LMS to reflect any changes in your management strategy.
Want to Read More?
Here are a handful of soil carbon related articles to check out:
- Soil Carbon 101- the basics of a soil carbon project
- Is my project eligible under the soil carbon method?
- A Soil Carbon Feasibility Report Explained
Keen to Hear More?
Explore our range of educational resources in our Carbon Farming Education Hub where we frequently publish educational articles, webinars, and guidebooks.
When you’re ready to explore the feasibility of undertaking a carbon project on your property, email us at hello@carbonfarming.org.au or give us a bell at (08) 6835 1140 to be connected with one of our project facilitators.


